Thursday 28 April 2016

On your marks..Get set..Go

This week, the challenge was to build and test junk-mobiles for speed and durability.


The first phase of this task was to put together the buggy by making wheels on axles and attaching them to the chassis or body. A wheel and axis unit is a simple machine-but it's not necessarily simple to make it work well as part of a buggy!

image from http://www.education.com

Lots of design choices were made here- the number, size and positioning of the wheels and axles, the type of axle and the shape, size and material of the chassis. In our design brief we asked the kids to make sure the wheels and axle could freely spin and that the whole buggy would be light but sturdy.


Now to get down to testing. Ready, set, go!! What happens when we launch our buggy down an incline? There's the sheer delight of making something that moves of course. It's equally fun to see what happens when you smash your truck into the wall at top speed.


Some vehicles do unintended stunts! A complete 180 degree turn or interlocking wheels for the girls' team trucks. One intrepid truck climbs on top of another one. This can be fun, but the design brief is to try and make the buggy to go straight. Time to make sure the axles are parallel and the wheels aligned.


The classic wonky wheel problem is common. These CD wheels are nice and big -which means they have a higher gear ratio than little wheels. Their lightness is generally good too-because the buggy is not weighed down by its wheels. But-there's a bit of an issue with their tendency to flop over.


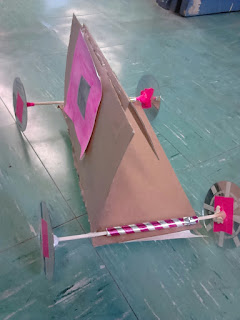
This triangular chassis helps to stabilize the axles and makes this large buggy quite successful.  


In this car. a design solution was using foam blocks to keep the wheels straight. Unfortunately this was not sturdy enough to support the chassis without the wheels tilting. Sometimes troubleshooting can be maddening -especially when you are running out of time. A veritable tape marathon to keep the CD wheels straight and non-wavering.


In this car, lateral movement of the axles makes the buggy turn corners.

In the second phase of this challenge we asked the kids to add a jet propulsion engine to their buggy. A balloon taped up to a straw is attached to the back of the chassis and works rather like a rocket booster. In theory, the air escaping from the straw-provides thrust which pushes the buggy forwards.


Perhaps two balloons will work better than one?


Best is a balloon with a short straw (to minimize friction for the escaping air). The placement of the balloon (and the direction the nozzle points in) is also critical to how well it works. The elastic quality of the balloon makes a difference too. Some types of balloons work better than others.


This car was light -and low on friction- and sped some way with this nice short balloon nozzle.

The finishing touch: add your own logo to the racing car to give it a personal touch. This was an great workshop of testing and improvement. Well done kids.


These design workshops are made possible  by the Toronto Arts Council.

Thursday 21 April 2016

Up next


This week was all about testing. We challenged the kids to build chain reaction structures - so called Rube-Goldberg machines. A pendulum swings into a ball, which rolls down a slope, which tips a domino train down, which hits a roll of tape, which sends a toy car off the edge of the table, which lands onto a …well you get the idea. There are an infinite range of design possibilities. This class provides a great opportunity to test them.

If we're lucky they work first time. But more likely the design needs a bit of tweaking.


This chute was made out of paper plates curled into scoops with duct tape. Their placement in a zig-zag down the wall is interesting but creates some challenges around reproducibility.


These cascading shelves work well and there's an alternative back-up route just in case the ball shoots the wrong way. 


Liked this winch design used to start the chain reaction machine.


This design uses multiple levels from table to floor.


Maybe these wheels and axles can be used to roll along this channel.


Traditional domino chains are good to turn the path around a corner.


 Lots of teamwork was in evidence for this class. Testing a chain reaction machine -which auto-triggers with a tiny vibration- requires patience and cooperation.

These workshops are made possible  by the Toronto Arts Council.

Thursday 14 April 2016

Talking pops!


This week we entered the world of book arts with  pop-up book design. Who doesn't love the delight of opening a great pop-up book?


As Montreal pop-up artist Natalie Draz says "there's no such thing as a new fold in pop-up design. It's basically all about the remix." Our pop-up session included the classic pop-up fold: the talk box (aka the mouth fold).


Kids and adults alike love the talk box. Because it's easy to make and because it immediately evokes a snapping mouth. It's a great introductory fold because it gently leads our young paper engineers into "thinking with their hands". For pop-up art, the paper must be coaxed into the form.


Once constructed, the talk box can be modified. Jagged teeth are popular. As are wagging tongues…


A talk box might conceal a secret hideout for the reader to discover...


With this page made we started to construct a storybook. Some students want to keep adding pages at home. Some kids added text others preferred more of a comic format, but either way storytelling and design narrative started to merge.


The tale of the mystic Lily Pad


These workshops are made possible  by the Toronto Arts Council.


Thursday 7 April 2016

Midway at the K


Roll up! Roll up! It's carnival time at Invention Squad. What better way to beat off the grey weather than to design a great fair game and play it with your friends? This was definitely the funnest, wackiest session yet. We challenged the kids to make a transportable/foldable set-up and to test it by playing it with their friends and parents. This is cardboard prototyping and design by play- a natural for kid experimenters.


Time for testing. This is a two person pool game, where players battle to pot balls into opposing pockets using cues made out of straws.


This is part of a multi-component racing game. After manoeuvring a ball through a maze, players compete to net baskets.  The prize is concealed in a series of pots. Testing allows our young designers to reconfigure and recallbrate their games. Perhaps it's too difficult. Maybe it needs to be sturdier.


In this tossing game, two players aim balls at the progressive targets and their stick moves along the racecourse.  Loads of action, lots of laughs.


These workshops are made possible  by the Toronto Arts Council.

Thursday 24 March 2016

Kritterville

The "Designing Our World" series has started at the TP Loblaw Boys and Girls' Club with a hoot, a growl and a meow. The critters have taken over the K-club playground. It's up to our young designers to make them a great habitat.

We started with a 2D spacing challenge: turn the K club building and grounds into Kritterville. After picking a creature -real or mythical, the kids started off by drafting a plan. This was a 2D bird's eye view. Every creature needs a good lookout and somewhere to stash their food, so we encouraged the addition of nooks, dens, play perches and play structures, connecting corridors and walkways to define the different domains.


This is a great ape habitat, with exclusive areas for gorillas, chimps, bonobos and orangutans and a shared security gated maze compound on the front roof area. This maze is where the great apes will find their food.

After this landscaping session we challenged the kids to transform their blueprint into a 3D model of their animal habitat.They had to build it from picnic wear -plastic cutlery, foam cups, paper plates, straws and coffee stirrers. Offering a limited selection of found materials to build with makes this modelling task a little trickier. It requires exploration of how the materials connect, flex and balance.


The students experimented with how to join materials in novel ways to shape and stabilize their structure. We asked them to do this with no glue and as little tape as possible to make them think about strength, balance and material manipulation-all critical qualities for architects and builders. Despite the fact that kids love tape, some of them rose to this engineering puzzle!


This is a bird cage, built with interlocking forks and a cup. If you use enough forks it is a very sturdy structure.

This branching sculpture is a play perch for baby pandas. It provides a shaded area to hangout under and gnaw on bamboo as well as several dens extended on branches at the top of the climbing structure.

This lizard cage is part of a rain forest compound built around the school. The design includes the sleeping cage, a water area and a play structure. And interestingly this was one of three groups that included security cameras in their design. 


This kritterville is a home for many different animals. Big cats can lounge on a rooftop terrain and snakes and other reptiles lurk in the shaded area underneath. The large tower is for bugs to scale and is connected to the bird nest compound by a narrow aerial walkway.

Architectural prototyping requires spatial perception, mathematical thinking and basic crafting skills.


These workshops are made possible  by the Toronto Arts Council.